Branching and merging with Git
Learn what Git branching is, why use it, and how to create and merge branches, including conflict resolution.

Introduction
If you're new to Git or want to know a little more about its basics and its distributed model, do not hesitate to read my Introduction to Git.
Branching and merging are great features, but to be really effective their implementations must be optimal, and Git excels here. The way it implements and exposes it for us is very simple, powerful, and fast to use. But the branching concept, and the way it works on Git, may look a little complex in the beginning. In this article I'll try to explain how it works in an easy and concise way, so you can take full advantage of its power. Let's start by explaining what is branching.
Do not type the $ sign you see in the command examples in this article.
That's just an indicator that you should run the command that follows it
in your command line tool.
What is branching?
Branching means you diverge from the main line of development and continue to do work without messing with that main line. (Chacon 47)
So it means you create a new branch to diverge from the main branch.
Why branching?
Branching has several use cases, and it's a very important feature, but you should know how to use it in your development cycle. That's out of the scope of this article, but to give you an example you can think that your project needs a change that can break things up, so you decide to create a new branch to work on those changes. That way you can go back to the main branch (usually master) at any time, and do any other modifications, even releasing a new version, without worrying about those potential breaking changes, because they are isolated in another branch. You can also create a new branch to experiment new things, implement new features, etc. Sounds good? It really is.
Master branch and the HEAD pointer
When you run $ git init or $ git clone commands to create a new repository, Git automatically creates a master branch for you, and points development to it.
Git has a special pointer to know what is the current branch, and it's called HEAD.
It's different than the concept of HEAD in other VCSs. HEAD in Git means the last snapshot (commit) of the current branch.
How do you know what branches you have, and which is the current one?
That's easy, you just run $ git branch.
If you run that right after $ git init, you should see something like:
* master
That means you only have master branch, and it's the current one, indicated by the * sign.
Current branch
Now, it's important to say that nearly every concept we've learned so far is related to the current branch we're pointing to at the moment we run our commands. So, modified and staged files, working directory, staging area, etc, are all related to the current branch (Git directory is an exception here, as it's the same for all branches in the project). Each branch has those concepts in an isolated way. Another import thing to note is that when you switch between branches, your working directory changes to reflect files (and their versions) of the target branch.
Starting a new repository from scratch
(If you don't know the basic commands of Git please head to Basic Git commands explained, then come back here.)
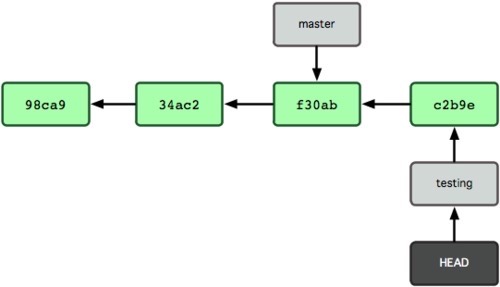
To illustrate how branching works, let's imagine a scenario: you just started a new repository, have made some changes and three commits in your master branch, so it looks like the following:

So, to Git, what really is a branch? Just a lightweight movable pointer to one of its commits (Chacon 48). Every time you commit, the current branch moves forward automatically to that commit. And every commit has one parent commit (except the first one), represented by the arrows on Figure 1.
When you create a new branch, it starts pointing to the last commit of the current branch, i.e., the branch you are in at the moment you create your new branch. So, immediately after creating a new branch, it's pointing to the same commit of the branch you were in, which means the working directory of your new branch will be the same as the branch you were in.
Creating a new branch
Let's create a new branch (testing), change the pointer to it, make some changes and commit.
Git doesn't allow us to switch between branches if we have uncommited changes in our working directory or stagging area.
To create a new branch, you run a command like $ git branch [branch-name], for example:
$ git branch testing
But that command doesn't point to it automatically (it doesn't move your HEAD pointer).
If you run $ git branch now, you should see something like:
* mastertesting
That pretty much confirms we now have a testing branch, but we're still pointing to master.
You need to run a command like $ git checkout [branch-name] to switch between branches, for example:
$ git checkout testing
Now we should be pointing to testing.
If we run $ git branch now, we should see something like:
master* testing
Cool. So, now let's imagine you made some changes to some files and committed them. The state of your repo would be like so:
Merging
Usually, you'll want to merge your new branch (testing in this case) into your main one (master) at some point, if you were successful in your changes, so you can keep working from it again, even creating new branches in the future. The way Git handles merging is very nice too, but it depends on the state of your files. Next, you'll see those cases.
Fast forward merge
In the current state of our repository, if you want to merge testing into master, it would be the simplest kind of merge that can possibly exist.
Because you didn't make any changes in your master branch after creating your new testing branch, running $ git merge command just moves master forward to point to the last commit in the testing branch, which in this case is the next commit, but you could have made n commits in testing before merging it.
To merge two branches, you have to point to the branch you want to merge into (master in this case, which will receive changes from testing) and run a $ git merge command:
$ git checkout master$ git merge testing
You'll notice a Fast forward feedback message, indicating a simple forward.
After that, your two branches point to a common commit again, as they were doing right after you created your testing branch).
At this point you can delete your testing branch by running a command like $ git branch -d [branch-name], for example:
$ git branch -d testing
That's the simplest merge possible, and it'll never render a conflict. But you want to be prepared for the real world, right? So you can be sure that conflicts will arise at some point! 😉
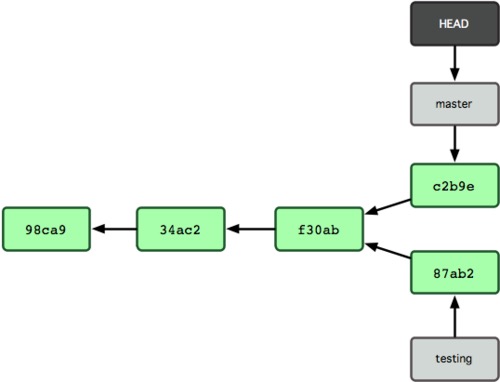
Three-Way merge
To simulate another possible merge case, a more complex one, let's pretend we didn't run the merge command above.
Let's go back to our master branch by running $ git checkout master (remember: when you switch between branches, your working directory changes too).
Let's then make a change and commit it. So now this is the state of our repository:
Now, we have isolated commits in both branches. Trying to merge them now will give Git some work. If no conflicts arise, i.e., if there are no changes in the same part of the same files, Git can do everything by itself, automatically.
So, in such case, what will Git do after we run $ git merge?
Go ahead and give it a try!
Git will do a simple three-way merge, using the last snapshot (commit) of each branch plus the common ancestor of both (f30ab in Figure 3).
To do that, Git creates a new snapshot (commit) that is referred to as a merge commit, and it's special because it has more than one parent (Chacon 57):

You'll notice a Merge made by recursive feedback message, indicating a more complex merging. After that, you can delete your testing branch if you're not planning to work on it in the near future.
You now might be thinking about conflicts, are you?
Resolving conflicts
Everything is nice and clear when we don't get conflicts. But fear nothing, Git is very elegant to handle conflicts too, you should have guessed it at this point.
Let's suppose you've changed the same lines of a text file in both branches (testing and master), and tried to merge them. Git will give you a feedback like this:
Auto-merging file-nameCONFLICT (content): Merge conflict in file-nameAutomatic merge failed; fix conflicts and then commit the result.
If you run $ git status now, Git will show you an Unmerged paths section listing files that are in a conflict state (both modified).
And this time Git didn't create a new merge commit for us, as the merge has failed.
But such conflict is very simple to fix. If you open that file, you should see something like this:
<<<<<<< HEADThis section was changed by master branch.=======This section was changed by testing branch.>>>>>>> testing
Everything that is below << HEAD and above == is the HEAD version of the file (the last snapshot of the current branch when you run $ git merge), in this case, the master branch version of the file.
And everything above >> testing and below == is the version of the file in the other branch (testing, in this case).
From the Git perspective, to fix that conflict you just have to remove those Git markers, manually, and save the file.
Also, if you prefer you can run $ git mergetool to open a visual merge tool.
After removing those markers, you need to tell Git that you've fixed that conflict.
You do that by running $ git add:
$ git add file-name
Now, when you commit your changes the merge will be done.
Conclusion
As we can see, Git handles branching and merging in a very elegant and fast way, you do everything in your local repository.
In the same way that you've created your testing branch, you can create any number of branches, in any direction. Your master branch can have any number of child branches, and a child branch (like testing in this example) can also have any number of child branches, and so on... To merge them all, a common approach is to merge a branch into its parent one, and so on.
So, that's it. Hopefully you now understand local branches much better. In the next article I'll talk about remote branches and tracking branches. Don't worry, now that you understand the basics about branching, it should be simple to understand the rest of the concept.
Related posts
- How to install Git with Homebrew on macOS
- Remote and tracking branches with Git
- Tagging with Git
- Basic Git commands explained
- Git workflow
- Introduction to Git
Interesting links
Bibliography
- Chacon, Scott. Pro Git. Apress, 2009.
Branching and merging with Git by Flavio Silva is licensed under a Creative Commons Attribution 4.0 International License.